Rabu, 29 Desember 2010

Tutorial Membuat Flashdisk Kebal Virus

Tutorial Membuat Flashdisk Kebal Virus

1. Buatlah sebuah folder dalam falshdisk anda, dan berikan nama "autorun.inf"(tanpa tanda kutip).
2. Masuk kedalam folder yang baru saja anda buat tersebut dan buatlah sebuah dokumen notepad didalamnya. Caranya klik kanan, pilih NEW > TEXT DOCUMENT, dan berikan sembarang nama untuk file yang baru saja anda buat (hasil akhirnya seperti pada gambar). Nama ini nantinya akan kita ganti dengan beberapa karakter khusus.

3. Setelah itu, kita akan membuka program CHARACTER MAP yang ada di START > ALL PROGRAMS > ACCESORIES > SYSTEM TOOLS > CHARACTER MAP.

4. Setelah CHARACTER MAP terbuka, pilih font yang ada embel2 unicode seperti Arial Unicode atau Lucida Sans Unicode. Scroll kebawah sampai anda melihat huruf2 Jepang, Korea,Cina, ato karakter2 aneh.

5. Pilih 4 atau 5 karakter yang anda inginkan, trus klik copy.


 6. Ubah nama ato rename file teks yang telah anda buat pada langkah 2 diatas. Klik kanan pada file tersebut, pilih rename, selanjutnya tekan [CTRL] + [V]. Nama file pun berubah. Jangan kaget bila nantinya anda akan melihat karakter seperti tanda kotak2 saja. Ga papa kok, itu normal kok.


7. Selesaaaaaaiiii....

Bagusan lagi setelah trik diatas uda selesai dibuat, ubah atribut folder autorun.inf jadi super hidden. Caranya, buka command prompt trus ketik F: untuk masuk ke drive FD ente (nb: sesuaikan drive FD ente. kalo drive FD ente di G, ya ketik G: ). Setelah itu ketik "attrib +s +h autorun.inf" (tanpa kutip tentunya) untuk menjadikannya super hidden.

Q: Kok bisa kebal virus ya?
A: Windows kan ga terima kalo ada 2 file yang mempunyai nama yang sama (smua orang juga tau kan). Nah, karena di FD kita uda ada nama autorun.inf, file lain ga boleh pake tu nama. Jadi virus uda ga bisa pake nama autorun.inf.

Q: Oooo, ga kaya manusia ya yang 1 nama bisa dipake banyak orang...?
A: Betul bro.

Q: Lho, kalo ga bisa dipake, kan virus bisa menghapus sendiri file ntu. Trus buat lagi deh autorun yang sesuai maunya tu virus. Gimana sih bro, tamba pusing ane nih...
A: Itulah gunanya file teks yang kita buat pake nama aneh tadi. Nama2 aneh itu dianggap virus sebagai karakternya Windows, padahal itu kan karakter unicode. Dan virus sendiri rata2 belum mendukung karakter unicode. Sampe botak tu virus ga akan bisa menghapusnya. Akhirnya FD kita aman dan terkendali.

  kalo di FD kalian ada file yang tidak dikenal dengan extensi .exe, .bat, .vbs, atau berbentuk folder,foto atau film tp sewaktu di properties folder, foto atau film tersebut statusnya "application".. sangat disarankan untuk tidak dibuka dan sebaiknya file tersebut di hapus saja...

Sumber: kaskus.us

Unlock & Unhide Windows 7 Hidden Themes

Mungkin sudah ada yg tahu dan juga ada yg blom mengetahui jika ada tema windows7 yg tersembunyi.

sekarang ane mau ngeshare gimana caranya membuka tema-tema tersembunyi di Windows 7 (bertema South Africa, US, Great Britain, Australia,
dan Canada)

Windows 7 Themes and wallpapers are amazing as compared to Windows vista. windows 7 has default 5 theme but Windows 7 beta 1 build 7000 onwards has several hidden & locked themes provided for regional countries such as Australia, Canada, Great Britain, United States and South Africa.

Since these hidden themes are installed along with your Windows 7 installation you can unlock/unhide these hidden Windows 7 Themes for regional contries. Below are three deferent methods to get Windows 7 hidden themes.

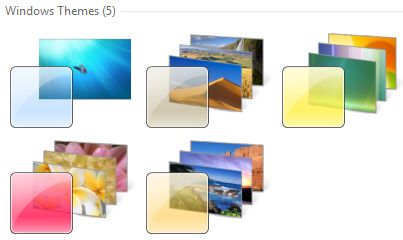
Screenshot of Default Windows 7 Themes 


Method 1: Steps to Unlock & Unhide Windows 7 hidden locked Themes

1. Unhide the Windows 7 System and Protected Operating System files from Windows explorer -> Organize -> Folder and Search Options -> view tab

2. Navigate to C:\Windows\Globalization\MCT.

3. Open a MCT-(AU, CA, GB, US, or ZA) folder for the regional theme that you want.
NOTE: AU, CA and ZA regions all have the same themes though.

4. Open the Theme folder in the selected region folder.

5. Select the .theme file to use it.
NOTE: Once you select a .theme file, Windows 7 will save it so that you will be able to change or select this theme again from within the normal Personalization window location.

6. Hide the Windows 7 System and Protected Operating System files.

7. Enjoy your new regional themes!!

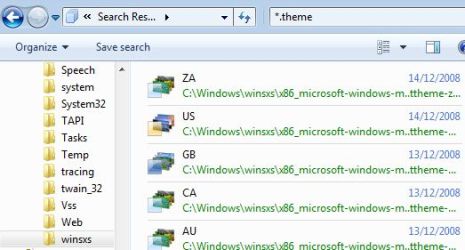
Method 2: Using windows 7 Search (Simplest Method)


3. Double click themes with name in the format of XX to apply and save the theme.

Method 3: Registry Entry

1. Open notepad and copy past the following lines

Windows Registry Editor Version 5.00

[HKEY_CURRENT_USER\Software\Microsoft\Windows\CurrentVersion\Themes\InstalledThemes\MCT]
“%windir%\\Globalization\\MCT\\MCT-AU\\Theme\\AU.theme”=””
“%windir%\\Globalization\\MCT\\MCT-CA\\Theme\\CA.theme”=””
“%windir%\\Globalization\\MCT\\MCT-GB\\Theme\\GB.theme”=””
“%windir%\\Globalization\\MCT\\MCT-US\\Theme\\US.theme”=””
“%windir%\\Globalization\\MCT\\MCT-ZA\\Theme\\ZA.theme”=””

[HKEY_CURRENT_USER\Software\Microsoft\Windows\CurrentVersion\Explorer\Wallpapers\KnownFolders\Windows Wallpapers\MergeFolders]
“%windir%\\Globalization\\MCT\\MCT-AU\\Wallpaper”=””
“%windir%\\Globalization\\MCT\\MCT-CA\\Wallpaper”=””
“%windir%\\Globalization\\MCT\\MCT-GB\\Wallpaper”=””
“%windir%\\Globalization\\MCT\\MCT-US\\Wallpaper”=””
“%windir%\\Globalization\\MCT\\MCT-ZA\\Wallpaper”=””
2. Save file as allregional.reg on desktop.

3. Double click on allregional.reg to add above registry entry.

4. Now you can access all Windows 7 Hidden & Locked Themes via right clicking on desktop and personalize settings.

We have created allregional.reg file for you, Download allregional.reg and run it on your machine and access hidden Windows 7 Themes instantly.

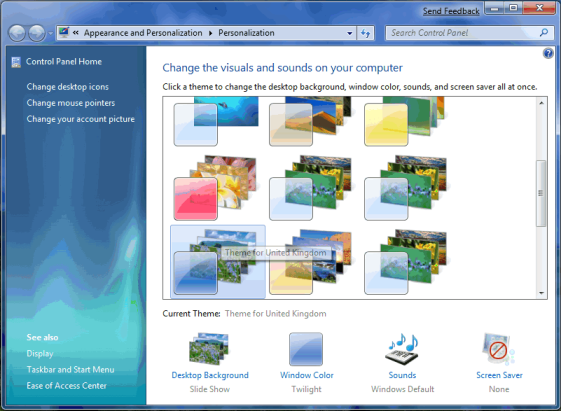
Screenshot of Unlocked – Unhide Windows 7 Hidden Themes


 Sumber: my digital life

Selasa, 28 Desember 2010

Key Basic Keyboard for Windows

HOTKEY yang tersembunyi di windows.... sebenernya banyak hotkey yang tanpa kita sadari bisa lebih mempercepat kerja


CTRL+C (Copy)
CTRL+X (Cut)
CTRL+V (Paste)
CTRL+Z (Undo)
DELETE (Delete)
SHIFT+DELETE (Delete the selected item permanently without placing the item in the Recycle Bin)
CTRL while dragging an item (Copy the selected item)
CTRL+SHIFT while dragging an item (Create a shortcut to the selected item)
F2 key (Rename the selected item)

CTRL+RIGHT ARROW (Move the insertion point to the beginning of the next word)
CTRL+LEFT ARROW (Move the insertion point to the beginning of the previous word)
CTRL+DOWN ARROW (Move the insertion point to the beginning of the next paragraph)
CTRL+UP ARROW (Move the insertion point to the beginning of the previous paragraph)
CTRL+SHIFT with any of the arrow keys (Highlight a block of text)
SHIFT with any of the arrow keys (Select more than 1 item in a window or on the desktop, or select text in a document)

CTRL+A (Select all)
F3 key (Search for a file or a folder)
ALT+ENTER (View the properties for the selected item)
ALT+F4 (Close the active item, or quit the active program)
ALT+ENTER (Display the properties of the selected object)
ALT+SPACEBAR (Open the shortcut menu for the active window)
CTRL+F4 (Close the active document in programs that enable you to have multiple documents open simultaneously)
ALT+TAB (Switch between the open items)
ALT+ESC (Cycle through items in the order that they had been opened)

F6 key (Cycle through the screen elements in a window or on the desktop)
F4 key (Display the Address bar list in My Computer or Windows Explorer)
SHIFT+F10 (Display the shortcut menu for the selected item)
ALT+SPACEBAR (Display the System menu for the active window)
CTRL+ESC (Display the Start menu)
ALT+Underlined letter in a menu name (Display the corresponding menu)
Underlined letter in a command name on an open menu (Perform the corresponding command)
F10 key (Activate the menu bar in the active program)

RIGHT ARROW (Open the next menu to the right, or open a submenu)
LEFT ARROW (Open the next menu to the left, or close a submenu)
F5 key (Update the active window)
BACKSPACE (View the folder one level up in My Computer or Windows Explorer)
ESC (Cancel the current task)

SHIFT when you insert a CD-ROM into the CD-ROM drive (Prevent the CD-ROM from automatically playing)
CTRL+SHIFT+ESC (Open Task Manager)
CTRL+TAB (Move forward through the tabs)
CTRL+SHIFT+TAB (Move backward through the tabs)
TAB (Move forward through the options)
SHIFT+TAB (Move backward through the options)
ALT+Underlined letter (Perform the corresponding command or select the corresponding option)
ENTER (Perform the command for the active option or button)
SPACEBAR (Select or clear the check box if the active option is a check box)
Arrow keys (Select a button if the active option is a group of option buttons)
F1 key (Display Help)
F4 key (Display the items in the active list)
BACKSPACE (Open a folder one level up if a folder is selected in the Save As or Open dialog box)

 RIGHT ARROW (Move to the right or to the beginning of the next line)
LEFT ARROW (Move to the left or to the end of the previous line)
UP ARROW (Move up one row)
DOWN ARROW (Move down one row)
PAGE UP (Move up one screen at a time)
PAGE DOWN (Move down one screen at a time)
HOME (Move to the beginning of the line)
END (Move to the end of the line)
CTRL+HOME (Move to the first character)
CTRL+END (Move to the last character)
CTRL+P (Print the current page or active pane)
ALT+Minus sign (-) (Display the window menu for the active console window)
SHIFT+F10 (Display the Action shortcut menu for the selected item)
F1 key (Open the Help topic, if any, for the selected item)
F5 key (Update the content of all console windows)

CTRL+F10 (Maximize the active console window)
CTRL+F5 (Restore the active console window)
ALT+ENTER (Display the Properties dialog box, if any, for the selected item)
CTRL+F4 (Close the active console window. When a console has only one console window, this shortcut closes the console)

Windows Logo (Display or hide the Start menu)
Windows Logo+BREAK (Display the System Properties dialog box)
Windows Logo+D (Display the desktop)
Windows Logo+M (Minimize all of the windows)
Windows Logo+SHIFT+M (Restore the minimized windows)
Windows Logo+E (Open My Computer)
Windows Logo+F (Search for a file or a folder)
CTRL+Windows Logo+F (Search for computers)
Windows Logo+F1 (Display Windows Help)
Windows Logo+ L (Lock the keyboard)
Windows Logo+R (Open the Run dialog box)
Windows Logo+U (Open Utility Manager)

Matriux 0.9.4 Operating System

Deskripsi

Matriux...ialah sebuah sistem operasi berbasis open source yang berfungsi untuk menjaga keamanan Cyber (security), melakukan siber forensik (cyber forensic) & melakukan serangan siber (hacking). Memiliki lebih 350+ aplikasi untuk menghadapi pelbagai peringkat siber termasuk taraf super computer (bisa buat lampu rumah on/off gitu, phone bisa dancing gitu...;p). Sistem operasi ini juga bisa di ubahsuai buat para programmer yang mahu (kali yang bisa lancar roket ke bulan gitu...;p)


"All good things arrive unto them that wait - and don't die in the meantime" - Mark Twain

Minimum System Requirements

And dont throw your old computers. Matriux can turn it into a powerful system. The minimum system requirements for running a Matriux lite edition:

Intel-compatible CPU (i486 or later)
32 MB of RAM for text mode, at least 96 MB for graphics mode with KDE (128 MB of RAM is recommended to use the various office products)
bootable CD-ROM drive, or a boot floppy and standard CD-ROM (IDE/ATAPI or SCSI)
standard SVGA-compatible graphics card
serial or PS/2 standard mouse or IMPS/2-compatible USB-mouse

 Authentification
Username: root
Username: tiger
Password: toor

Downloads Details
Flavor - Matriux "Xenon" (2010.11.03) :: [ md5=9ed78fd11ac4e6fa318accab9660ba9d ]
Mirrors:Sourceforge.net
Torrent:The Pirate Bay

 Matriux "Lithium" 0.9.4 - beta1 (2009.11.27) :: [ md5=f200b17d4f9ba97672516dbeaf13f533 ]
 Mirrors:Sourceforge.net
 Torrent:iso Hunt

 Masih kurang mengerti silahkan ke: Matriux home

GNU/LINUX

What is targeT?

Apa itu targeT GNU/Linux?

targeT GNU/Linux (selanjutnya disebut targeT Linux) adalah distribusi linux yang sesuai namanya dikhususkan sebagai “target/sasaran” hacking. Distro Linux ini dapat dijalankan langsung dari CDROM / Live CD maupun dari USB Disk / Live USB. Komputer yang menjalankan distro ini nantinya akan berperan sebagai server target alias server “korban”. Target dan korban disini maksudnya sebagai server yang menjalankan service-service yang diketahui memiliki bug, cacat alias kelemahan didalam sistemnya. Kelemahan – kelemahan inilah yang nantinya digunakan oleh client / attacker untuk “menguasai” server targeT.


Gambar 01.
targeT 0.1, dijalankan langsung dari Live CD

Tentunya untuk dapat menggunakan distro ini dengan baik diperlukan sedikitnya dua buah komputer. satu komputer menjalankan distro ini sebagai server, dan lainnya terhubung dalam jaringan sebagai client/attacker.

Distro ini merupakan turunan dari  Slackware 11 , dan dibuat dengan menggunakan script dari Linux live , Script yang sama digunakan untuk membangun distro BackTrack  Lisensi yang digunakan adalah GPL. Dengan demikian Anda bebas menggunakan dan mendistribusikan tanpa biaya lisensi apapun.

Pengembang berharap distro ini dapat digunakan sebaik-baiknya untuk pembelajaran dan untuk hal-hal yang mulia. Mohon jangan gunakan untuk hal-hal negatif, melanggar hukum atau kegiatan illegal lainnya.

Thx untuk seluruh komunitas hacker di Indonesia

(e-c-h-oBali hackaikmelKecoak-Elektronik ,  #newbiehacker, #hackerlink, #antihackerlink, awaliid-slackwareId-ubuntuForum linuxlinux balikpli kamu, dan seluruh komunitas yang tidak dapat disebutkan satu persatu)

Screenshoot : Sumber

 Rasanya kurang menarik kalo bahas distro linux tapi ga ada screenshotnya Berikut screenshot penampilan dari distro GNU/Linux targeT versi 0.1 “Junior” (Silahkan klik pada gambar untuk melihat dalam ukuran yang lebih detail)

 Tampilan targeT saat booting pertama dari LiveCD atau LiveUSB

 Desktop targeT menjalankan teks editor Leafpad

 Pilihan style/tema desktop yang beragam. Desktop memakai Fluxbox

 File Manager berbasis GTK

 Email client menggunakan Sylpheed. Cepat dan ringan

 Console atas menampilkan hasil monitoring realtime beragam serangan terhadap webserver. (Pada screenshot tampak percobaan serangan dengan teknik XSS attack) . Sementara pada console bawah menampilkan arus trafik yang masuk dan keluar. Sementara itu gkreallm di sebelah kanan menampilkan status server saat ini (free memory, jumlah proses, suhu prosesor dsb).


 Console atas menjalankan iftop dimana ditampilkan ip komputer yang terhubung dengan server targeT beserta port dan bandwidth yang dipakai. Sementara pada console bawah menampilkan secara realtime passive probing terhadap sistem yang digunakan oleh client yang terhubung ke server targeT. Tampak di screenshot, attacker melakukan upaya scanning terhadap port-port yang di jalankan server. Dalam hal ini sistem mendeteksi kalau si attacker menggunakan nmap dan OS Linux dalam menjalankan aksinya.

 Menjalankan perintah netstat. melihat port yang aktif dan statusnya

 Beragam service server yang dapat dijalankan: Apache, MySQL, DNS, DHCP, FTP, Samba, Pop3/Imap, SMTP, SSH, Webmin, Usermin, VNC. Masing- masing service telah dibuat sedemikian rupa sehingga memiliki hole/celah yang diketahui dapat dimanfaatkan oleh attacker untuk menguasai mesin targeT

 Selain pada jaringan kabel, targeT juga dapat digunakan pada jaringan wireless / nirkabel. Paket-paket untuk wifi sudah diinclude didalamnya, termasuk ndiswrapper. Tampak di screenshot, console atas menjalankan perintah iwlist untuk melihat daftar akses point yang aktif. Dalam hal ini mesin targeT bertindak sebagai akses point dengan mode AdHoc dan essid “TARGET”.

 Dibawah ini adalah hasil scanning yang dijalankan dari komputer client /attacker dengan nmap terhadap mesin targeT. Kok ada IIS? ga salah tuh? hehe..

 Salah satu aplikasi web di targeT yang siap untuk dijadikan “korban” . Blog Siti yang berbasis wordpress ini diketahui memiliki hole yang dapat dimanfaatkan oleh attacker untuk menguasai server.
Screenshot dari layar attacker yang berhasil menjalankan exploit WordPress dengan bantuan Metasploit


Gimana? menarik bukan? buruan coba deh

Requirement


Untuk dapat menjalankan GNU/Linux targeT 0.1 “Junior” dengan baik diperlukan persyaratan berikut ini:
CD Blank 700 MB / DVD Blank / USB Pendrive 500 MB (ISO targeT nantinya di burning atau di copy ke media ini)
Rekomendasi: USB Pendrive 1 GB. Boot dari USB jauh lebih cepat ketimbang boot dari CDROM. Selain itu juga tidak bising, karena tidak terganggu dengan bisingnya suara drive CD-ROM. Khususnya saat komputer yang menjalankan targeT di “bombardir”.
Komputer minimum Pentium 3 1 GHz, bisa bootable dari CDROM/USB. Memori Minimal 256 MB
Rekomendasi: Komputer sekelas Pentium Celeron 1.8 GHz. Memori 512 MB. Apabila ada kelebihan memori misal 1 GB, pilihan boot dengan tambahan opsi copy2ram sangat disarankan Karena seluruh isi CD otomatis akan dicopy ke RAM dahulu, sehingga prosesnya tidak perlu memanggil dari CDROM. Sangat kencang
Terhubung dalam jaringan
Bisa lewat jaringan kabel LAN maupun jaringan wireless.


 Download 

 Bagi yang berminat menjadi mirror dan ingin dicantumkan disini, silahkan hubungi pengembang melalui email di majalah.linux _at_noSPAM_ gmail.com atau ym! di: online_baliwae. Untuk yang koneksi internetnya terbatas dapat  Memperoleh CD dsini

______________________________________________


atau download ftp://dl2.foss-id.web.id/iso/target/target-0.1.junior-i386.iso


TKP: http://target.slackware-id.org/download/


Sumber: slackware